Wednesday, July 20, 2016

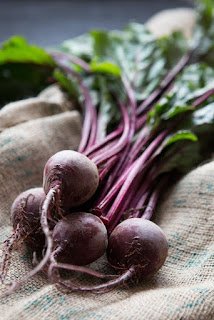
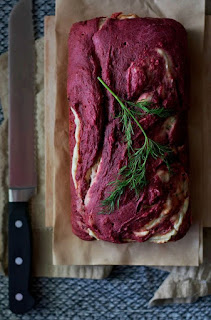
Beet Bread with Cream Cheese


This gorgeous, luscious beetroot loaf is so hard to resist, especially when coupled with sweet caramelized red onion marmalade and melt in your mouth cream cheese or Camembert.

Here’s the recipe, sourced from http://www.10thkitchen.com/  I couldn’t resist.

For bread
  • 1 1/4 cups self-raising flour
  • 1 cup whole wheat flour
  • 1 tablespoon baking powder
  • 1 teaspoon salt
  • 1 cup roasted beet puree (recipe below if you need it)
  • 3 eggs
  • 2/3 cup milk
  • 1/2 brick unsalted butter, melted and cooled

For cream cheese swirl
  • 115 grams cream cheese
  • 1 egg
  • 3 tablespoons self-raising flour
  • 1 ½ tablespoons fresh chopped dill
  • Pinch of salt

Method

·         To make roasted beet puree, wrap three medium washed, trimmed, and dried beets in foil and roast in a 400-degree oven for about 40 minutes, until they're pierced easily with a sharp knife.
·         Cool, peel, and puree in a blender or food processor until smooth.
·         Preheat oven to 350 degrees. Generously grease out a 9x5 loaf pan with butter.
·         In a large bowl, whisk together the self-raising flour, whole wheat flour, baking powder and salt.
·         In a medium bowl, whisk together the beet puree with eggs, milk, and melted butter. Stir the mixture into the flour mixture with a wooden spoon until slightly blended through.
·         To make the cream cheese swirl, combine cheese, egg, four, dill and salt in a small bowl and stir until smooth.
·         Spoon about 2/3s of the beet batter into the buttered pan and spread to the edges to even out. Dollop cream cheese mixture over it, then top with the rest of the beet mixture. Run a butter knife in a swirling motion through the layers to create the swirl pattern.
·         Smooth out the top a little, then bake for 45-50 minutes, until a toothpick inserted in the middle comes out clean (a few moist crumbs are fine).
·         Cool on a wire rack for about 10 minutes before removing from pan.
·         Serve warm or at room temperature, along with soft camembert or brie, hummus, red onion marmalade, fig or grape jam.
·         Be prepared to be sent into orbit in culinary delight.


Wednesday, September 2, 2015

Exotic Purple Cabbage Salad


It's not the sexiest vegetable out there, but cabbage is packed with a range of vitamins and minerals and fibre, with red cabbage offering 10 times more vitamin A than its green counterpart.

Its aubergine hue and bitter, peppery flavour signify that you’re getting two types of cancer-preventing substances. The red pigment comes from plant-based chemicals called flavonoids, while the sharp flavour is the result of sulfur-based compounds.

I have never been a huge cabbage fan, and my earlier memories are those of my mother making meatball cabbage rolls, which I disliked profusely. It has only been in recent years, after my obsessive interest in concocting delicious recipes with all sorts of vegetables, that I started to enjoy cabbage. Red cabbage especially, since it has a gorgeous purple colour and it’s extremely versatile and healthy.

It was a few years ago that a close friend of mine shared this Chinese cabbage salad recipe with me, and now I want to share it with you. The recipe suggests using green cabbage, but I prefer using the purple variety. The only thing I need to point out about the recipe, is that you must toss and pour the dressing over only just before serving otherwise it goes soggy.

Chinese Cabbage Salad with Crunchy Noodles

WHAT YOU NEED
  •  cabbage, shredded
  • 1 bunch green spring onions (shallots), chopped
  • 1 large carrot, grated (optional)
  • ½ packet spinach leaves, shredded (optional)
  • 1 Maggi 2-minute noodles (discard flavourings and crush)
  • 12 cup sesame seeds
  • 1 cup slivered almonds
  • 13 cup sunflower seeds

Dressing
  • 23 cup olive oil
  • 2 tablespoons soy sauce
  • 12 cup brown sugar
  • 13 cup vinegar

METHOD

To make the dressing mix all ingredients together.
Heat some oil in a frying pan and brown the noodles, seeds and nuts.
Just before serving toss the nut mixture through the cabbage and spring onions.
Pour dressing over and serve immediately.


Wednesday, August 19, 2015

Sinfully sensational red wine ideas


Raspberry Red Wine Slushy with Chocolate Whipped Cream

INGREDIENTS FOR THE SLUSHY:
  • 1 cup Sweet Red Wine
  • 1 cup Frozen Raspberries
  • 1 teaspoon Sugar (optional)
  • 1 cup Ice 

FOR THE WHIPPED CREAM:
  • ½ cups Heavy Whipping Cream
  • 1 teaspoon Sugar
  • 1 Tablespoon Cocoa Powder

METHOD
To make the slushy blend the wine, frozen raspberries, and sugar (optional) for 30 seconds in a blender. Strain the slushy mixture into a bowl through a mesh strainer to remove any raspberry seeds. Place the strained slushy mixture back in the blender with the ice. Blend 30 more seconds. Place mixture in the freezer while you make the whipped cream.

For the chocolate whipped cream: Beat the heavy cream, sugar and cocoa powder in a medium sized bowl with an electric mixer for approximately 5 minutes or until stiff peaks form.

To assemble, pour slushy into glasses and top with whipped cream.


Raspberry and Red Wine Granita

Hands-on time: 15 minutes
Rest time: 1 hour
Time to table: 12 - 24 hours
Makes about 10 servings

INGREDIENTS
  • 1 bottle fruity red wine
  • 3/4 cup water
  • 1 cup (200g) sugar
  • 350 – 450g frozen or fresh raspberries (a berry blend works great too)
  • Fresh raspberries, for serving, optional

METHOD
In a saucepan, mix the wine, water and sugar and bring to a boil. Let boil hard for a minute, stirring to help the sugar dissolve.

Take off the heat, stir in the raspberries and let steep for an hour or more in the refrigerator.

Place a mesh strainer over a bowl and pour the wine mixture through it. Press the raspberries through the mesh with the back of a spoon. (Use the smashed berry flesh in a smoothie or the morning oatmeal!)

FOR GRANITA
Transfer the berry-wine mixture to a freezer container. To avoid spilling, place the container inside another dish. (Use a 9x13 pan, a spill makes a huge mess in the freezer.) Freeze until hard, about 12 hours. 

With the tines of a fork, scrape the frozen mixture to fluff into icy crystals and serve immediately.

FOR SORBET
If you prefer a smooth, fruity sorbet and have an ice cream maker, by all means, use it. Chill the berry-wine mixture first then process until firm.

MAKE-AHEAD
This can be made several days, even a week in advance. After it freezes, just apply cling wrap to the surface to avoid freezer burn. Lasts several weeks.


Cheesecake ice cream with blueberry & red wine Swirl

INGREDIENTS
  • 230g cream cheese, softened at room temperature
  • 1½ cups heavy cream
  • 1½ cups full cream milk
  • ¾ cups, plus ½ cups sugar, divided
  • zest of half a lemon
  • 3 large egg yolks
  • juice from half a lemon
  • 2 teaspoons vanilla extract
  • 1 cup blueberries
  • ⅓ cup red wine
  • ½ cup crushed cream crackers (optional) 

METHOD
Beat the cream cheese in a large bowl, set aside.

In a large saucepan, add the cream, milk, ¾ cups sugar, and lemon zest together. Heat on medium until the cream mixture is steaming and simmering at the edges.

In a medium bowl, briskly whisk the egg yolks, and slowly pour 1 cup of the cream mixture into the egg yolks, ensuring you are whisking the eggs constantly as you pour in the cream. Slowly pour the egg mixture back into the saucepan, while whisking the saucepan constantly as you poured the egg mixture in.

Continue to heat and stir the mixture with a wooden spoon the mixture until it thickens. You can test this by running your finger down your spoon to see if a line remains.

Strain the mixture through a fine mesh strainer into the bowl with the cream cheese. Whisk the mixture until there are no lumps (you can use an immersion blender to speed things up) and chill until the mixture reaches 40 degrees F - at least 2 hours, preferably overnight.

While the ice cream mixture is chilling, heat the remaining ½ cup sugar and blueberries together in a small saucepan until the juices escape the blueberries and begins to resemble syrup. Whisk in the red wine and allow the mixture to chill.

Take out the chilled ice cream mixture and pour in the lemon juice and vanilla extract. Churn in an ice cream machine according to manufacturer instructions.

Begin to pour the ice cream in an air tight container, Drizzling the blueberry sauce (and graham cracker crumbs if using) between layers of the ice cream. Allow the ice cream to freeze for about 3 - 4 hours until firm.


Thursday, August 13, 2015

Eggplant and Zucchini Gratin – by Julia Child

This weekend presents the perfect opportunity to indulge in one of my favourite dishes, after watching Ratatouille, for the 100th time last night. Besides it’s fabulous colour and ridiculously low cost, aubergine, a.k.a. eggplant dishes are usually heartier than other vegetable based recipes. It’s a common substitute for meat dishes and adds some bulk to this gratin especially, but also makes a fantastic side dish for those who are Banting. Just replace the breadcrumbs with crumbed cauliflower. 

INGREDIENTS
  • 1/2 cup or so olive oil
  • 1 large or 2 medium eggplants
  • 1 tablespoon herbs de Provence
  • 1 teaspoon salt
  • 2 medium zucchini (baby marrows)
  • 3 or 4 ripe large tomatoes
  • 1 ½ cups onions
  • 2 green peppers
  • 2 cloves mashed garlic
  • 1/2 teaspoon freshly ground pepper
  • 3 tbsp minced parsley
For bread-crumb topping:

  • 1/2 cup or so fresh bread crumbs, not too finely ground
  • 1/3 cup or so freshly grated Parmesan cheese
For herbs de Provence, substitute the following mixture:
  • 2 tsp each dried thyme
  • 1/4 tsp dried rosemary and
  • 1/4 tsp mint
  • 1/8 tsp fennel seeds
  • 1/8 tsp dried sage
METHOD
Peel and cut the eggplant. Make sure you cut eggplant into lengthwise slices that are about 1-inch wide, 3-inch long, and 3/8-inch thick. Scrub the baby marrows and cut into pieces the same size as the eggplant. Take a bowl and put the vegetables into it. Toss the vegetables with one teaspoon salt. Set them aside for 30 minutes. Drain every slice and dry with a towel.

Take a pan and put four tablespoons of olive oil into it. Sauté the baby marrows and eggplant, one layer at a time, for about one minute until they vegetables are slightly browned. Take them out and place into a dish.

Cook pepper and onions in the same pan. Add a couple of tablespoons of olive oil if needed. Cook the vegetables for 10 minutes until they are tender. Add the garlic and season the mixture with salt and pepper.

Take the tomatoes and slice them into 3/8-inch strips. Layer the tomatoes over the pepper and onions, and season them with salt and pepper. Cover the pan and let the vegetables cook for about 5 minutes on a low heat until the tomatoes start to render their juice. Check the seasoning and raise the heat. 

Boil the vegetables in the tomato juice until the juice evaporates entirely.

Take a casserole, about 2½-inch deep, and put 1/3 of the tomato mixture into it. Sprinkle the freshly minced parsley over the tomatoes. Next, arrange half of the baby marrows and eggplant on top. Layer the remaining tomatoes and parsley. Put the remaining bay marrows and eggplant on top, and finish off with the rest of the tomatoes and parsley.

Cover the casserole and put it on a low heat. Let everything simmer for about 10 minutes. Check it after 10 minutes, and season it if necessary. Raise the heat a little and cook everything for 15 minutes uncovered. Cook until all the juices evaporate. Be very careful about the heat. Avoid the vegetables getting scorch at the bottom of the casserole.

Take it out, and serve!


The majority of this recipe above is written directly from her site (http://juliachildsrecipes.com/dinner/julia-childs-ratatouille/), which I find grammatically refreshing. I have changed it here and there.

Monday, July 20, 2015

Scandalous Fig & Chèvre Canapés


When you take the voluptuous shape, the sweet dark flesh with its honey scent and the unique texture on the tongue of a ripe fig into consideration, I don’t think I need to convince anyone of the aphrodisiac qualities.
The fig is one of the first recorded scandalous fruit. The ancient Greeks thought figs were sacred and associated them with love and fertility. The Romans believed figs were a gift from the god of intoxication, Bacchus. Adam and Eve covered themselves in fig leaves in the Garden of Eden making some scholars believe that the forbidden fruit was actually a fig and not an apple.
Curvy temptress Cleopatra loved figs and when she decided to take her own life they were a part of her last luxurious meal. Come to think of it, if I were given the choice of a last meal, it would also include fresh figs, along with camembert and honey, but…I digress.
Legend has it, that eating a fresh fig while naked in front of a woman is at the top of the list for performing an erotic act. So if you ever run out of ideas of what to feed your lover in bed, go forth, and feed them figs.
Try this exotic recipe to WOW your partner, or your guests at a cocktail function:
Fig & Chèvre Canapés

(Chevre is French for Goat's cheese)

INGREDIENTS

  • ½ kg fresh figs
  • 100g fresh baby rocket
  • 250g honey flavoured chèvre
  • 1 slice of prosciutto, cut into thin strips

METHOD
Rinse, dry and remove the top from the figs. Make 2 deep cuts into the fig perpendicular to one another, then pipe a half teaspoon of chèvre into the opening.


How to prepare and devour an artichoke


Because the artichoke was considered an aphrodisiac in the 16th century (and still is today), it was reserved for men only, as it was thought to enhance sexual power. It was considered a scandalous adventure for any woman.

But whether or not you believe in the romantic power of the artichoke, eating an artichoke is an extremely sensual culinary experience.

Ingredients
  • 2 large fresh artichokes
  • 1 cup (226.8g) unseasoned bread crumbs (you can use gluten-free if you like)
  • 1/4 cup grated fresh parmesan cheese (optional)
  • 1 cup fresh parsley leaves - chopped
  • 1 large (or two medium) fresh garlic cloves
  • A drizzle of olive oil
  • Salt and pepper to taste

Method

Rinse and dry each artichoke. Remove the toughest outer leaves along the bottom. With kitchen shears (or scissors) cut the tips of each (except the tender inner leaves) leaf. With a sharp knife slice off the top of the artichoke and the stem (leaving just a short stump so it can easily sit upright in the pan).

After you've cleaned and cut them, you can steam them at this point, but this is so much more of a culinary experience.

Finely chop parsley and garlic and mix with the bread crumbs. Add parmesan if you like. Season with salt and pepper.

Spread apart each row of leaves and fill with the bread crumb mixture. Once filled, set them in a pot just big enough to hold them up. (Three is easier than two). Fill the pot with water reaching almost to the top of the bottom row. (This is why you can't cut the whole stem off - you need some height). Add a slice of lemon to the water to keep them green.

Drizzle each row with some extra virgin olive oil - making sure to drizzle the oil into the 
breadcrumbs.

Cover and simmer for about an hour or until the leaves are tender and you can easily pull one out.

Remove when done and place on a plate with a bit more olive oil, seasoned with salt and pepper for dipping.

Getting to the heart

Only the inside of the leaves get eaten. So take a leaf, hold it from the cut tip and simply scrape the flesh inside between your teeth.

This is not the most lady-like maneuver, which is why eating them should rather be enjoyed at home alone – or with your lover.  The inside of the leaves are tender enough to eat whole. And when you get to the core, you'll see it covered with lots of gritty hairs, which should obviously not be eaten! Pull out the hair to reveal the heart of the artichoke - tender enough to slice with your fork. It's the best part.a whole artichoke. It might seem a little intimidating at first if no one has shown you how to prepare and eat them. But the leaves are moist and tender once roasted, and the heart is by far the most delicious part of the entire process and totally worth the effort.

Roast Beetroot Tapenade


The beets in this recipe have an incredible aubergine colour and gorgeous flavour that’s enough to lift anyone's spirits.

According to a study published in the Journal of Applied Physiology in 2010, researchers found out that drinking beet juice balances the oxygen use that allows your body to tap in on your energy and stamina wisely. The reason for this is because the nitrates found in beet juices make it easier for oxygen to get into your muscles and allow you to breathe.

Roast Beetroot Tapenade

Add this spread to sandwiches instead of butter or mayonnaise, use it as a dip for crackers and vegetable sticks, serve it with bruschetta or even just as a beautiful appetizer.

INGREDIENTS
  • 1 can butter beans
  • 1/4 cup tahini
  • 2 tablespoons lemon juice
  • 4 cloves garlic, minced
  • 1/2 cup roasted beets, chopped
  • 1/2 teaspoon cumin
  • Salt and pepper
  • Paprika
  • 1 tablespoon olive oil

METHOD

Put all ingredients (except olive oil), in a food processor, adding salt, pepper, and paprika to taste. With the food processor still running, drizzle in olive oil and blend until well combined.

If you want a smoother texture, add a bit of water. For more flavour, add more spices.
Note: To roast beets, place on a baking sheet or wrap in aluminium foil and bake in a 180-degree oven for 30 to 45 minutes. Remove and once cool, peel off skins and chop into chunks.